Nebula Stories App - step-by-step guide on how to create a full stack app with backend on AWS and frontend using Swift
App Overview:
Nebula-Stories-App is an iOS storytelling platform where users can sign up, sign in, read the stories, and like and comment on the stories that they enjoyed reading.
User Authentication:
Utilizes Amazon Cognito for managing user authentication, with a user pool for data storage and an identity pool for access.
Content Storage:
Employs S3 Buckets for storing story texts, ensuring reliable and scalable delivery.
DNS Services:
Route 53 is used for DNS services, linking the app's custom domain to AWS resources.
Content Delivery:
CloudFront serves as the content delivery network, offering reduced latency and increased transfer speeds.
Security:
ACM (AWS Certificate Manager) manages SSL/TLS certificates for secure, encrypted connections.
Database Services:
DynamoDB is used for storing user interactions like story likes, providing fast and scalable database services.
Backend Processing:
Lambda functions handle backend processing, triggered by actions like user likes.API Management: API Gateway acts as the intermediary for frontend-backend communication, securing REST API calls.
Serverless Architecture:
All services (Cognito, S3, Route 53, CloudFront, ACM, DynamoDB, Lambda, API Gateway) are serverless, offering reduced operational overhead, scalability, and cost-effectiveness.
IAM Roles:
- For Cognito: Ensures user authorization, allowing interaction with S3, DynamoDB, Lambda and API Gateway with necessary access.
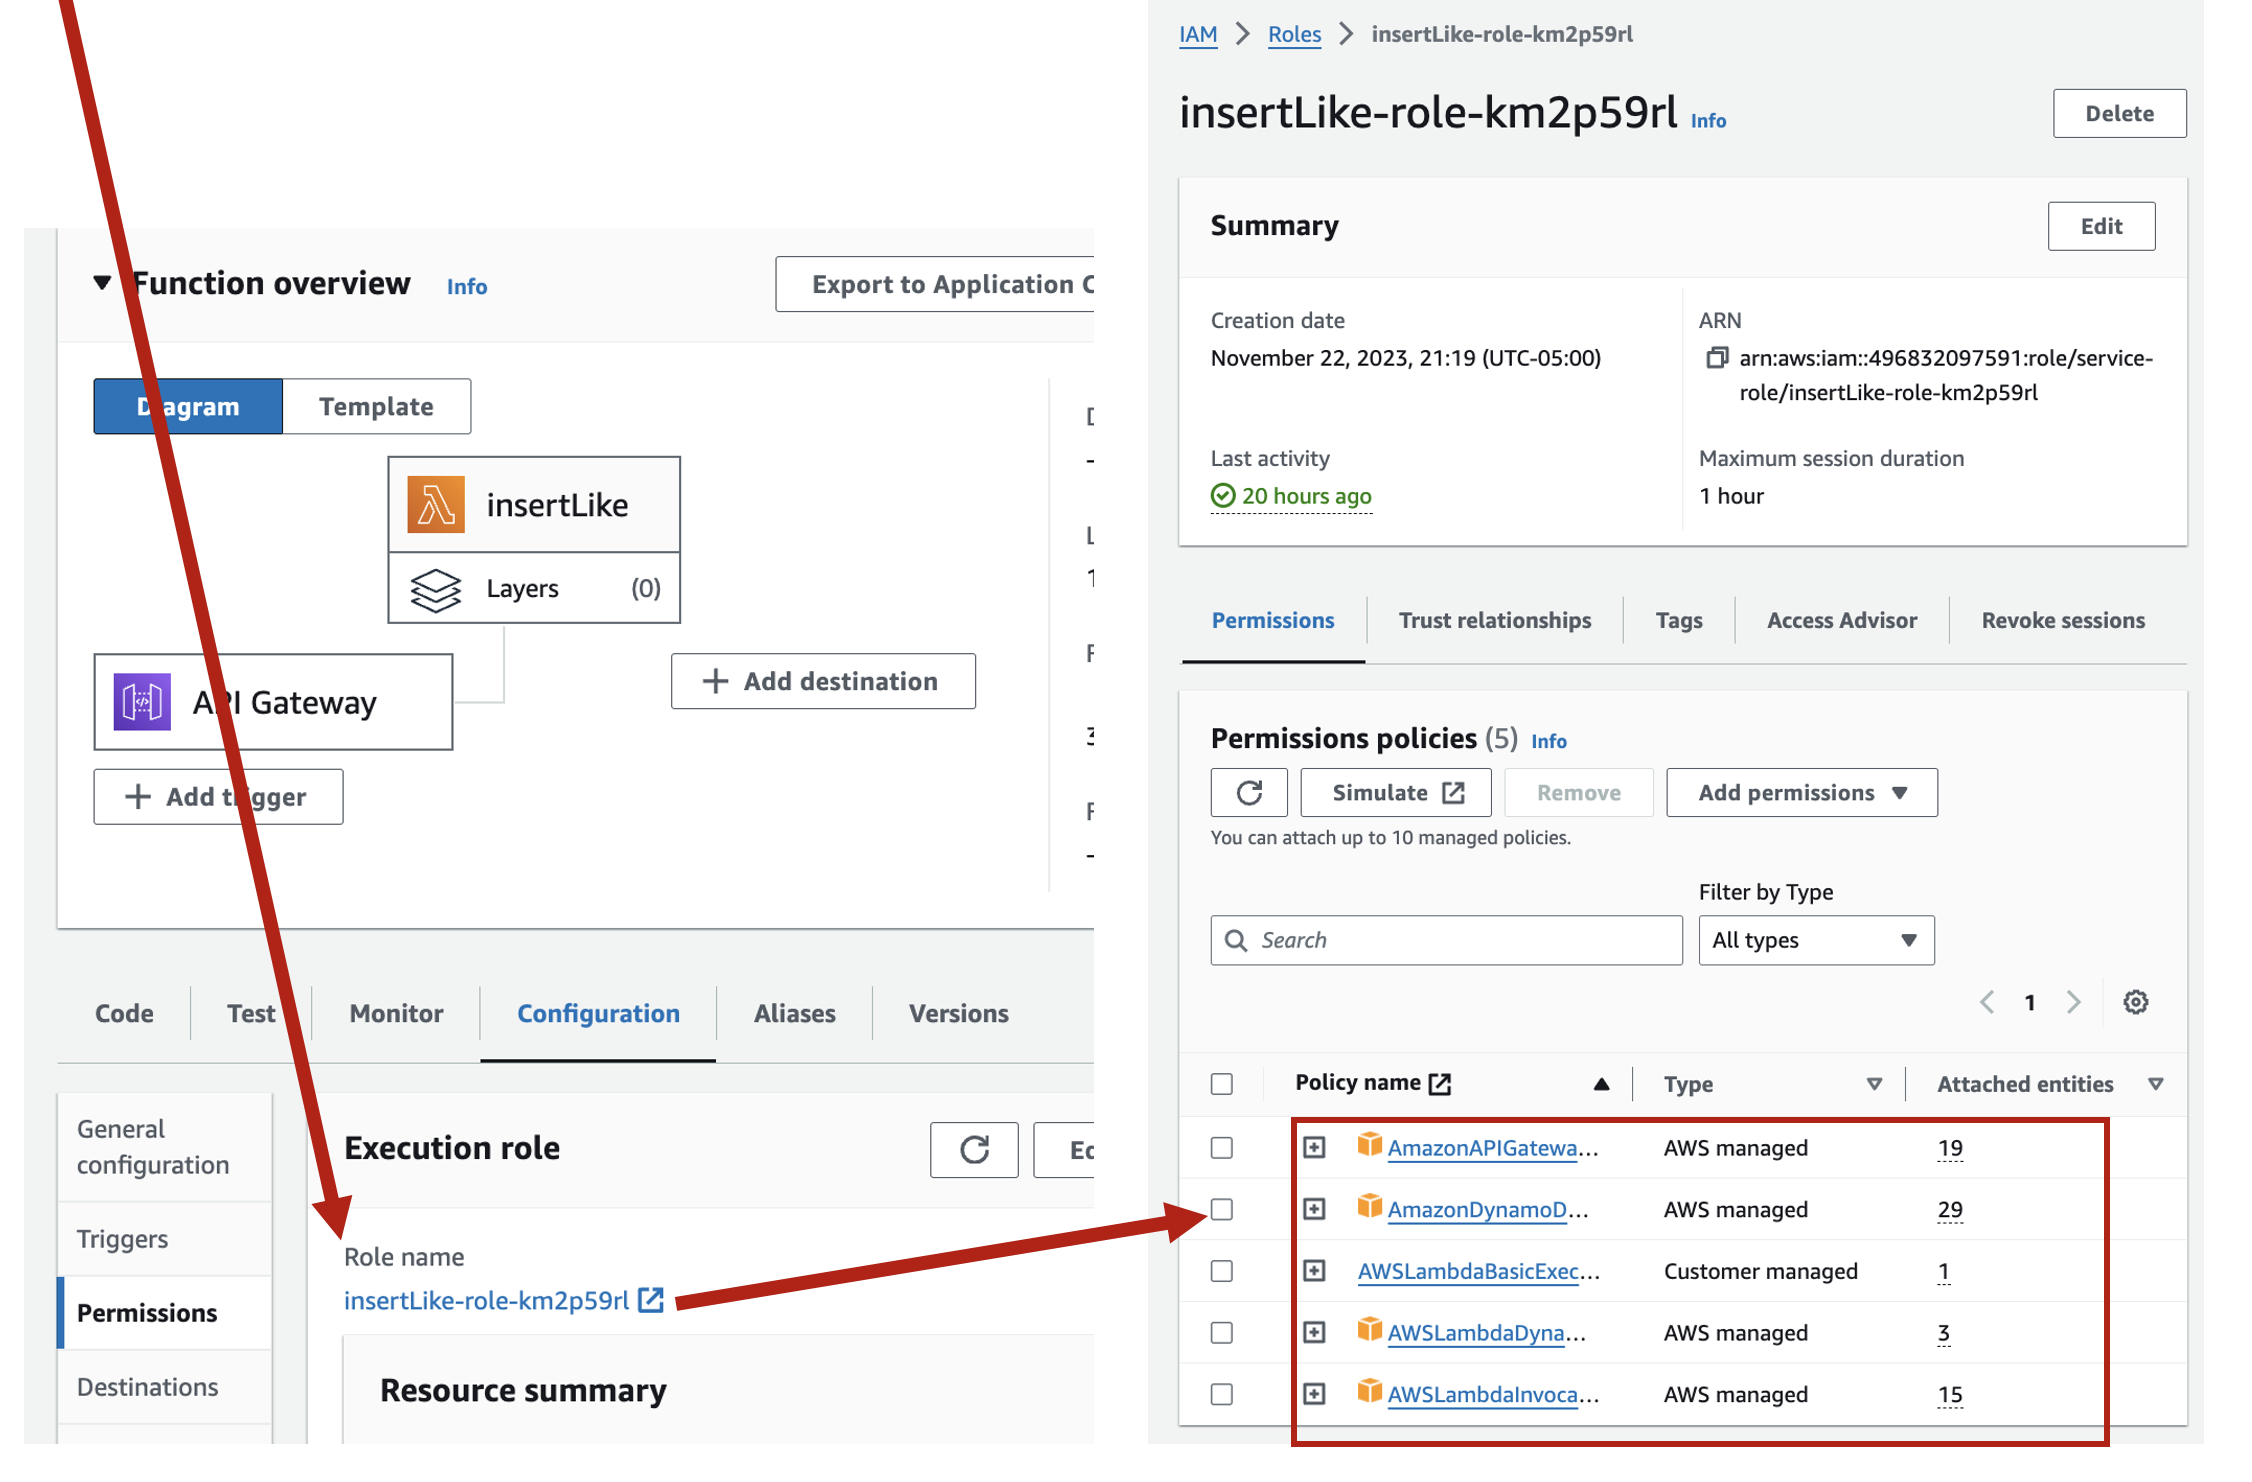
- For Lambda Functions: Each Lambda function has a specific IAM role for interacting with DynamoDB, including permissions for database operations.
---------------------------------------------------------------------------------------------------------------------------------------------------------
For simplicity let's divide it into three parts:
Part 1: User Authentication and Authorization – Cognito UserPool and IdentityPool (with IAMroles to give full access to S3 and DynamoDB) -
Part 2: Content Storage and Delivery – S3, Custom domain name, CloudFront, Route 53, ACM
Part 3: User Interactions (likes and comments) – API Gateway, Lambda, DynamoDB, IAM roles forlambda to interact with DynamoDB
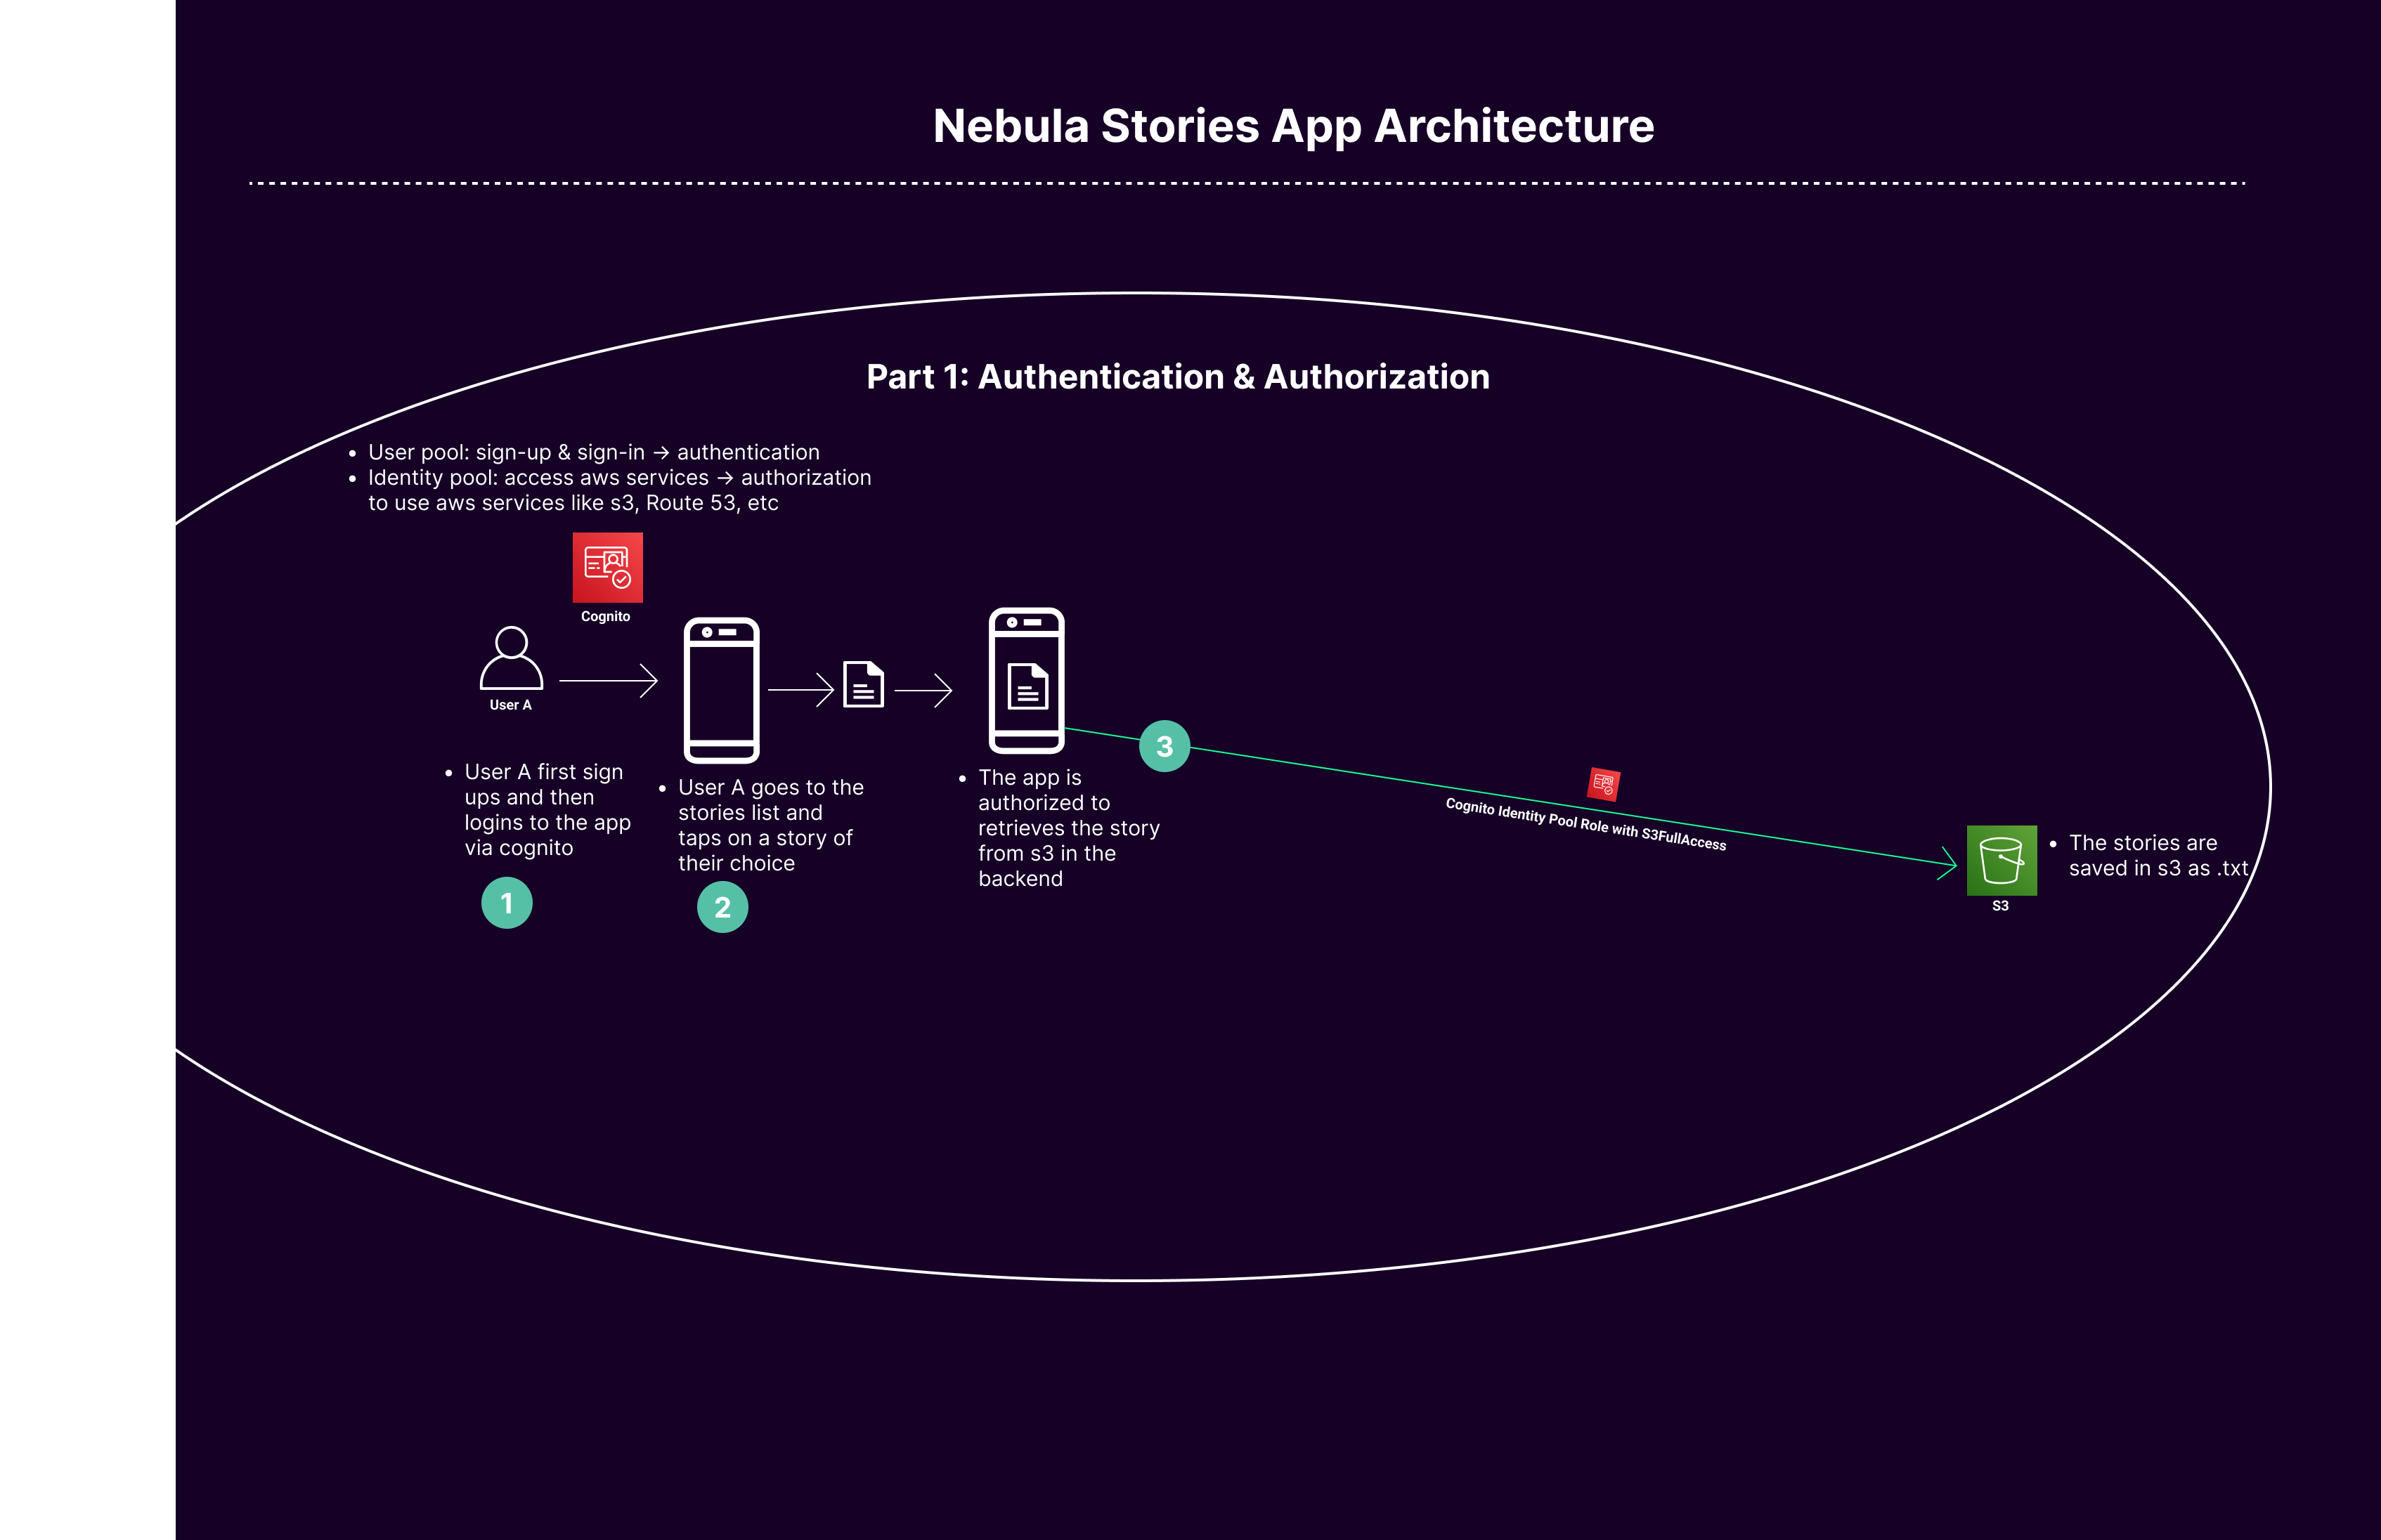
Part 1: User Authentication & Authorization
AWS Services used in Part 1:
Cognito User Pool: Amazon Cognito User Pools serves as a secure user directory, enabling users to sign up and sign in to the app. It handles user management and authentication, providing options like email and password-based logins, and integrates seamlessly with web and mobile applications.
App Client in Cognito User Pool: The App Client within the Cognito User Pool represents the application interface for user authentication. It's responsible for interfacing with the user pool to authenticate users, using credentials like client IDs and secrets to maintain secure communication.
Cognito Identity Pool: Cognito Identity Pools (also known as Federated Identities) enable users to obtain temporary AWS credentials to access other AWS services like S3 and API Gateway. This allows for the creation of a secure and scalable way to authorize users to access AWS resources directly, based on their identity.
A. Creating the Backend:
1. Creating Cognito User Pool ('stories-user-pool'):
- Purpose of User Pool: The Cognito User Pool serves as a user directory that provides sign-up and sign-in options for app users.
- Role of App Client and Secret: The App Client represents your application in the user pool and is used to authenticate users. The generated secret adds an extra layer of security for server-side operations.
Detailed Steps:
• Go to the Amazon Cognito console.
• Click “Manage User Pools” and select “Create a User Pool.”
• Name your pool 'stories-user-pool' and choose “Step through settings.”
• Customize the required attributes (like email, name) for sign-up.
• In “App clients,” add a new app client. Name it relevantly and check the box for “Generate client secret.”
• Review and create the user pool.
2. Creating Cognito Identity Pool ('stories-identity-pool') and IAM Role:
• Purpose of Identity Pool: It enables users to obtain temporary AWS credentials to access AWS services like S3 and API Gateway.
• Role of IAM Role: This role defines the permissions that the authenticated users are granted.
Detailed Steps:
• In the AWS Console, go to the Cognito service and select “Manage Identity Pools.”
• Click “Create new identity pool,” name it 'stories-identity-pool', and enable access to unauthenticated identities if required.
• Set up authentication providers (like your Cognito User Pool).
• Create an IAM role for authenticated users with permission to access necessary AWS services (like S3 Read/Write, API Gateway).
Understanding IAM and Cognito:
• IAM Trust Relationship vs. Permission Policy vs. Inline Policy:
• Trust Relationship: Determines who can assume the role (like a gatekeeper).
• Permission Policy: Defines what actions the role can perform (like a set of rules).
• Inline Policy: A directly attached policy to a single user or role, providing specific permissions.
• Difference Between Cognito User Pool, Identity Pool, and App Client Secret:
• Think of the User Pool as a user directory (like a school's student database), Identity Pool as a system to grant access to school facilities (like a library), and the App Client Secret as a student ID card with a unique barcode, enhancing security.
B. User Interaction with the App and What Happens in the Backend:
1. User Sign-Up:
• User Action: User enters their personal information and clicks submit.
• Backend Process:
o The app client sends the sign-up request to the Cognito User Pool.
o The User Pool creates a new user record.
o The App Client Secret is used to authenticate this request securely.
2. Email Verification and Account Confirmation:
• User Action: User enters the confirmation code received via email.
• Backend Process:
o The confirmation code is sent to Cognito.
o Upon successful verification, Cognito marks the user's account as confirmed.
3. User Sign-In and Accessing Stories:
• User Action: User signs in and selects a story to read.
• Backend Process:
o User credentials are verified by the User Pool.
o Upon successful sign-in, Cognito Identity Pool grants temporary AWS credentials.
o These credentials allow the user to access the story from S3.
C. Integrating Backend with the Frontend:
After setting up the Cognito User Pool and Identity Pool, you need to integrate these with your iOS app. This involves passing the necessary identifiers to your app so it can communicate with the AWS services.
1. Noting Down Key Identifiers:
After creating your Cognito User Pool and App Client, AWS provides unique identifiers. You need to note down these details:
o Cognito User Pool ID: This is the identifier for your user pool, labeled as [YOUR-COGNITO-USER-POOL-ID].
o App Client ID and Secret: These are the credentials for your app client, labeled as [YOUR-APP-CLIENT-ID] and [YOUR-APP-CLIENT-SECRET], respectively.
o Cognito Identity Pool ID: This is the identifier for your identity pool, labeled as [YOUR-COGNITO-IDENTITY-POOL-ID].
2. Adding Identifiers to the iOS App Code:
These identifiers need to be incorporated into your app’s code to enable communication with AWS Cognito. Here’s how to do it:
For User Pool:
• Open your iOS app's configuration file or the section where you manage external service configurations.
• Add the Cognito User Pool ID ([YOUR-COGNITO-USER-POOL-ID]) and App Client ID ([YOUR-APP-CLIENT-ID]) in the relevant sections. The App Client Secret ([YOUR-APP-CLIENT-SECRET]) is typically used in backend servers for added security and may not be necessary in the frontend code, depending on your architecture.
For Identity Pool:
• Locate the section in your iOS app where you configure AWS service access.
• Insert the Cognito Identity Pool ID ([YOUR-COGNITO-IDENTITY-POOL-ID]) to set up the connection with AWS for accessing other services like S3.3.
Testing the Integration:
• Once you've added these identifiers, test the sign-up, sign-in, and story access functionalities in your app.
• Ensure that the app correctly interacts with AWS Cognito for authentication and authorization, and that it can access AWS resources like S3 buckets as intended.
• Incorporating these identifiers into your app is crucial for the authentication process and for accessing AWS resources. It allows your app to securely manage user identities and provide personalized experiences. Remember to handle these credentials securely and avoid exposing sensitive information, especially in client-side code.
Part 2: Storage & Content Delivery
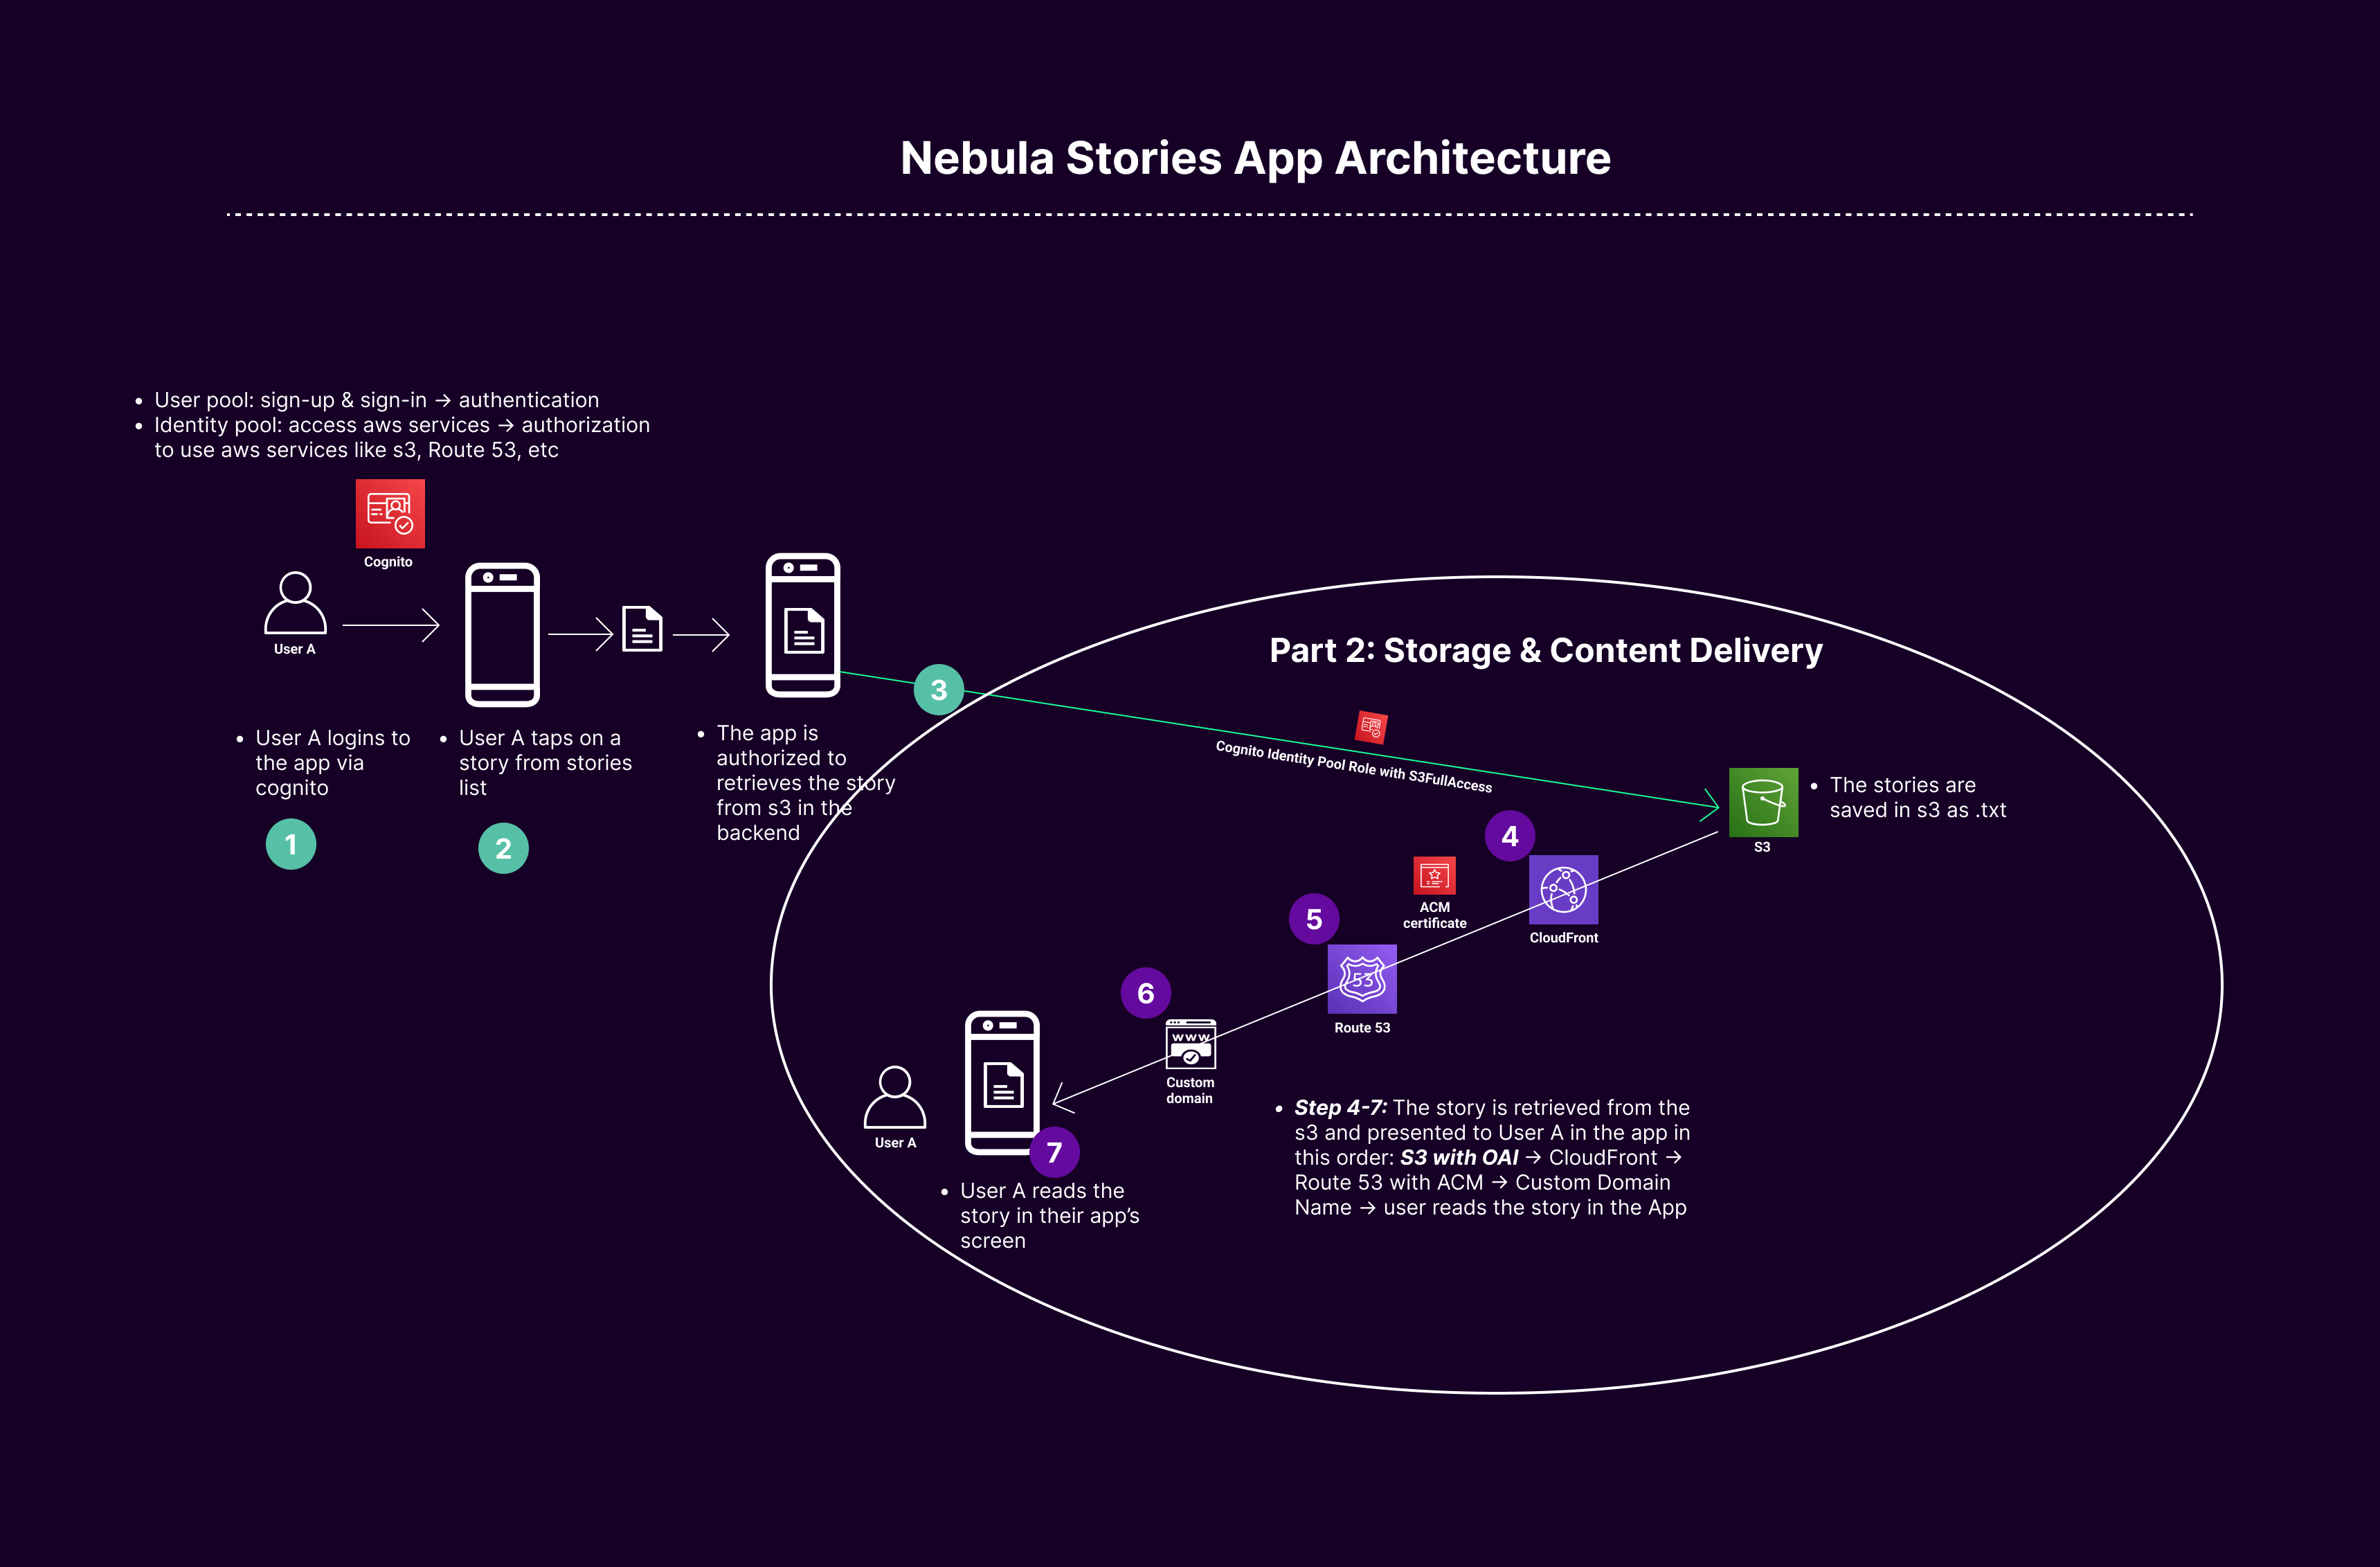
AWS Services used in Part 2:
S3 Bucket: An Amazon S3 bucket is a public cloud storage resource available in Amazon Web Services (AWS) Simple Storage Service (S3), akin to a file folder that stores objects (data and its descriptive metadata).
Route 53: AWS Route 53 is a scalable and highly available Domain Name System (DNS) web service, functioning like an internet’s traffic controller, directing users to the appropriate location for accessing web resources.
CloudFront: Amazon CloudFront is a fast content delivery network (CDN) service, which securely delivers data, videos, applications, and APIs to customers globally with low latency and high transfer speeds.
ACM (AWS Certificate Manager): AWS Certificate Manager (ACM) handles the complexities of creating, managing, and deploying SSL/TLS certificates for web applications, ensuring secure, encrypted web traffic.
A. Creating the Backend:
1. Custom Domain Name:
A custom domain name, like nebulastories.online, is a user-friendly, easily memorable web address used to access your content online. It's akin to a personalized nameplate for your digital house.
Detailed Steps:
• Visit a domain provider (e.g., GoDaddy) and search for nebulastories.online.
• Purchase the domain and note the details for integration with AWS Route 53.
2. Route 53 Setup:
a. Creating a Public Hosted Zone:
Public vs. Private Hosted Zone:
A public hosted zone in Route 53 is like a public phone directory for the internet, mapping domain names to IP addresses, while a private hosted zone is like an internal phone directory, only accessible within a specific organization or network.
Detailed Steps:
• Access AWS Management Console, navigate to Route 53.
• Select “Create Hosted Zone.”
• Enter nebulastories.online as the domain name and create the zone.
• Keep rest of the settings default
b. Updating NS Records in GoDaddy:
DNS Concepts:
• DNS (Domain Name System): Acts like the internet's phone book, translating domain names to IP addresses.
• NS Records (Name Server Records): Direct traffic to the DNS servers that handle your domain, like signposts directing to your digital location.
• A Records (Address Records): Link domain names to their corresponding IP addresses, like assigning a specific number to a phone contact.
• SOA Record (Start of Authority): Holds administrative information about a domain, like a manager in charge of a company’s contact list.
• CNAME (Canonical Name Record): Redirects one domain to another, functioning like a forwarding address.
CNAME vs. Alias Record:
• CNAME: Redirects traffic from one domain to another, like a forwarding address for mail.
• Alias Record: A Route 53-specific record type, linking one AWS resource to another, functioning like a bridge within AWS services.
Detailed Steps:
• In GoDaddy, navigate to your domain's settings.
• Access “Manage DNS” -> “Name Servers.”
• Update Name Servers with NS records from Route 53, excluding trailing dots.
3. ACM Certificate:
ACM (AWS Certificate Manager) manages SSL/TLS certificates for secure HTTPS connections, serving as a digital passport for establishing trust and encrypted communications. ensuring that data transferred between the user and the website is encrypted and secure.
Detailed Steps:
• Access AWS Certificate Manager.
• Request a public certificate for nebulastories.online.
• Choose DNS validation, keeping default settings, and submit the request.
• In the ACM console, under the domains tab, select “Create records in Route 53” to create a CNAME for certificate validation.
5. CloudFront Distribution:
Acting like a network of express delivery routes for web content, CloudFront speeds up the distribution of your website's data to users worldwide by caching content in various locations (e.g., faster loading of www.fastwebsite.com globally)
Detailed Steps:
• In AWS CloudFront, create a new distribution.
• Set your S3 bucket (nebula-stories) as the origin.
• For Origin Access Identity (OAI), choose “Legacy access identities,” create a new OAI, and set it to update the bucket policy.
• Enable “Redirect HTTP to HTTPS.”
• In “Alternate Domain Names (CNAMEs),” add nebulastories.online.
• Select your ACM certificate.
• Configure WAF settings if needed.
• Create the distribution and wait for it to deploy.
Configuring Route 53 with CloudFront:
After the CloudFront distribution is active, in Route 53, create an Alias record to link the domain to CloudFront.
CNAME vs. Alias for CloudFront:
- CNAME: Redirects traffic from one domain to another, like a forwarding address for mail.
- Alias Record: Directly connects a domain to a CloudFront distribution, serving as a dedicated path for web traffic. A Route 53-specific record type, linking one AWS resource to another, functioning like a bridge within AWS services.
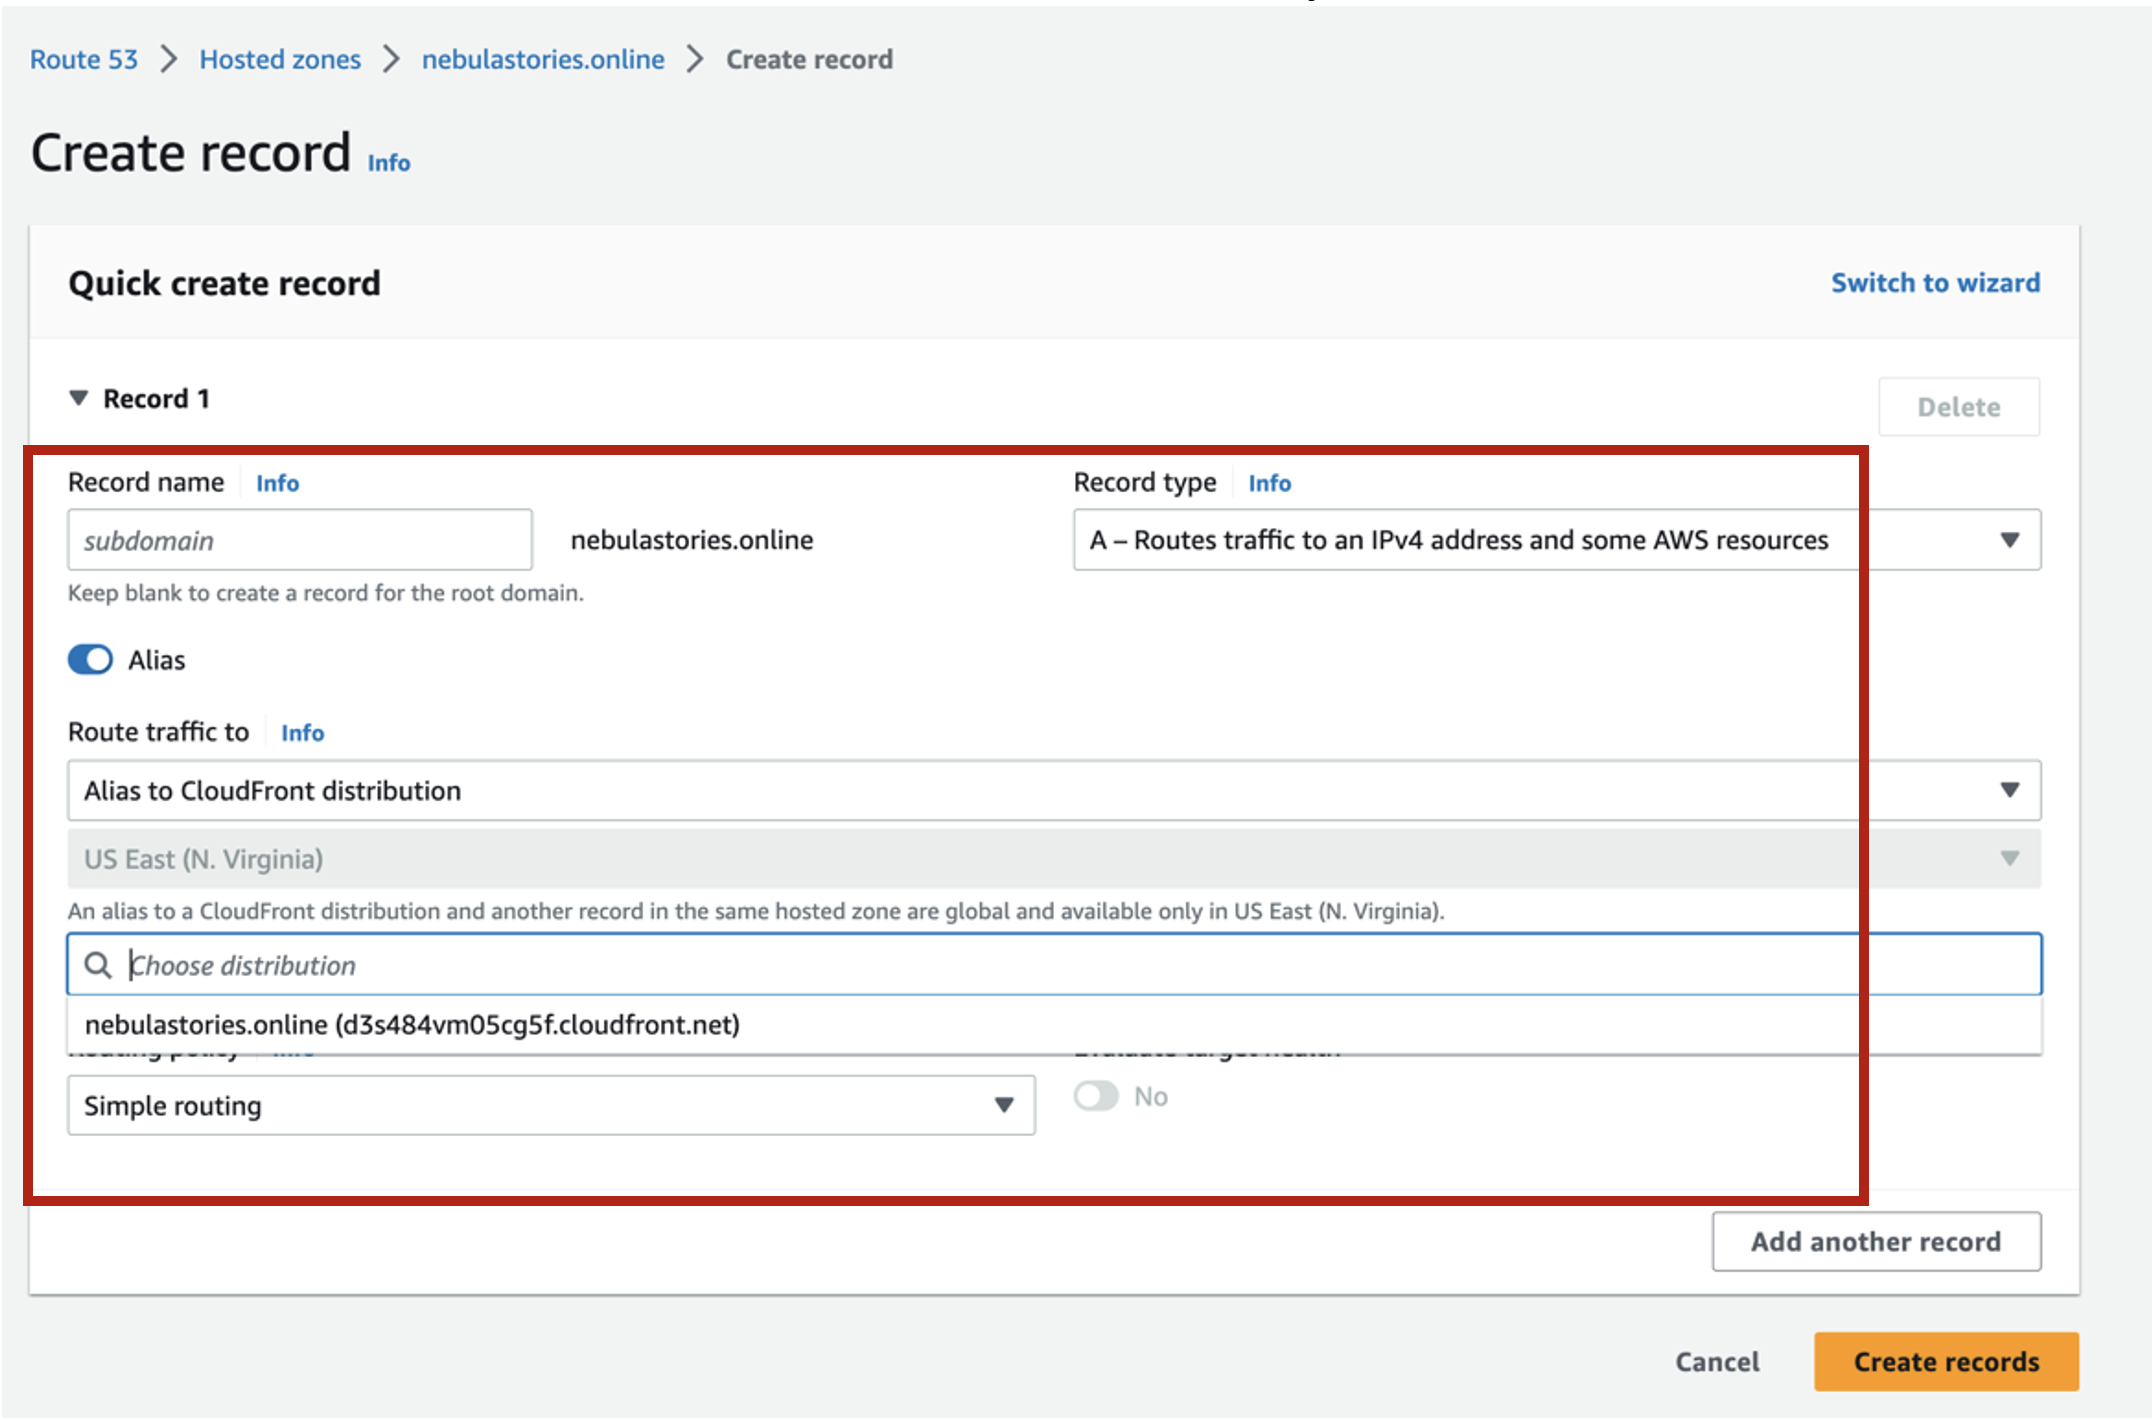
Steps to create Alias record for CloudFront to be mapped to Route 53
• Create an Alias Record in Route 53 for CloudFront.
• Toggle ON Alias, and don’t add anything in the subdomain
• In the Route traffic choose CloudFront
• In the choose distribution add the name of your CloudFront
Full Video on Part 2
Part 3: User Interaction - Stories Likes & Comments
Part 3.1: Inserting and Incrementing likes - DynamoDB, Lambda Function & API Gateway (POST method)
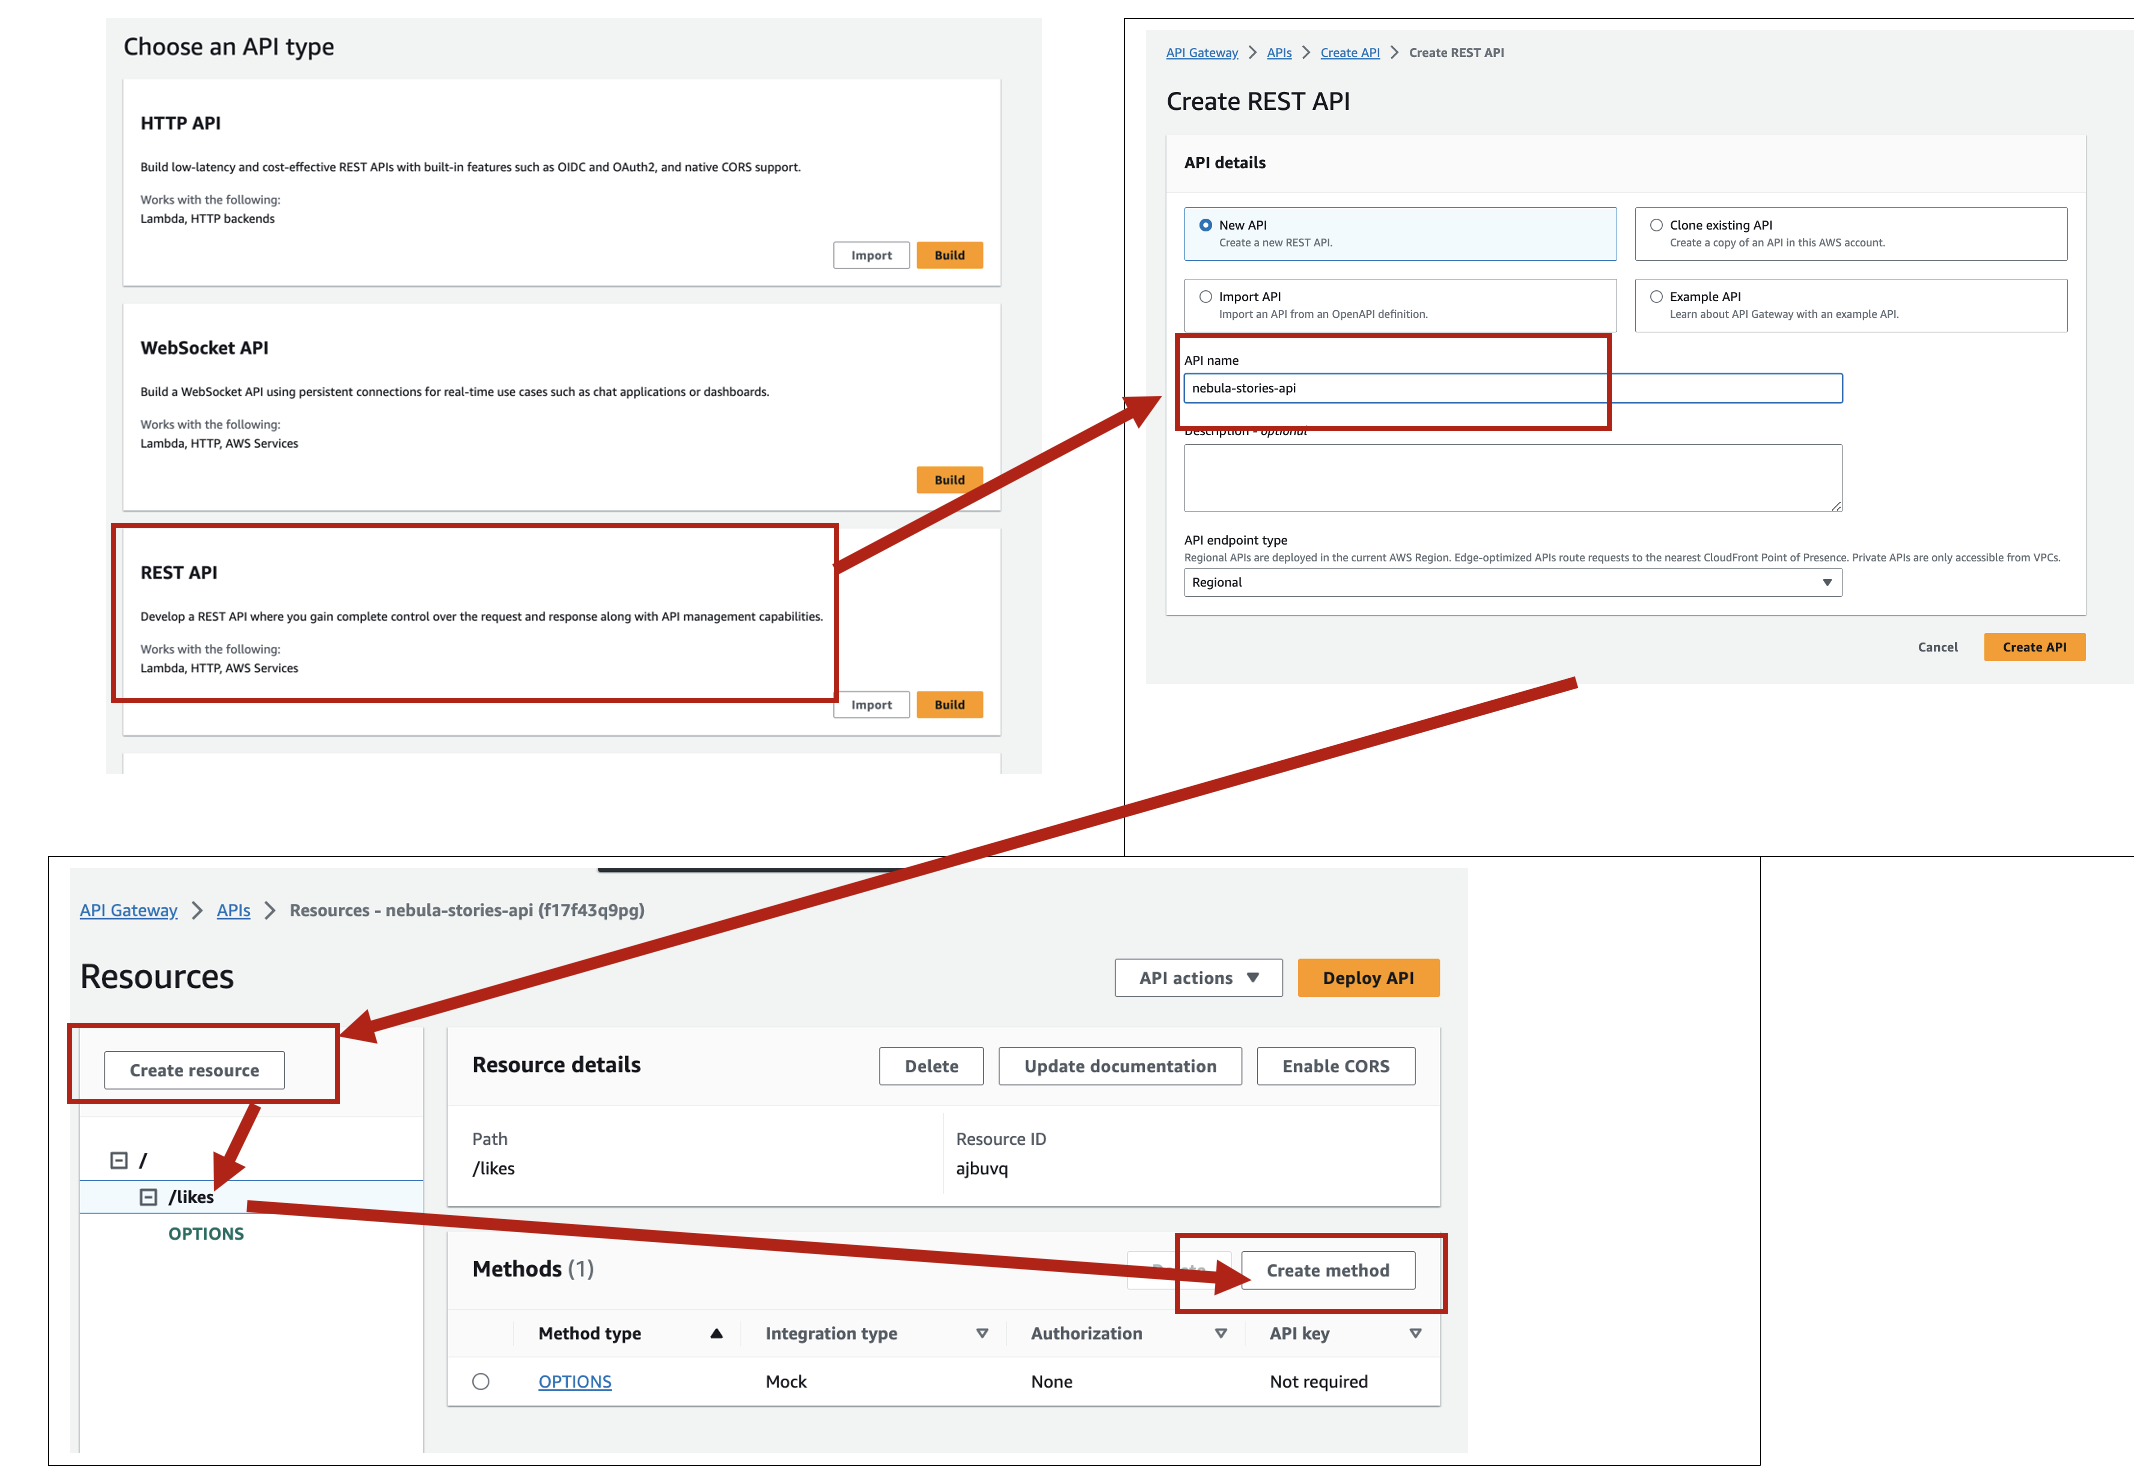
3. Setting up API Gateway:
POST and GET Methods:
• GET Method: Retrieves data from a server, analogous to asking a question and getting an answer.
• POST Method: Sends data to a server, similar to filling out a form and submitting it.
Detailed Steps:
• Access the API Gateway service in the AWS Management Console. insertLike, loadLike, loadUserLikeStatus, usersWhoLiked, loadComment, loadCommentCount
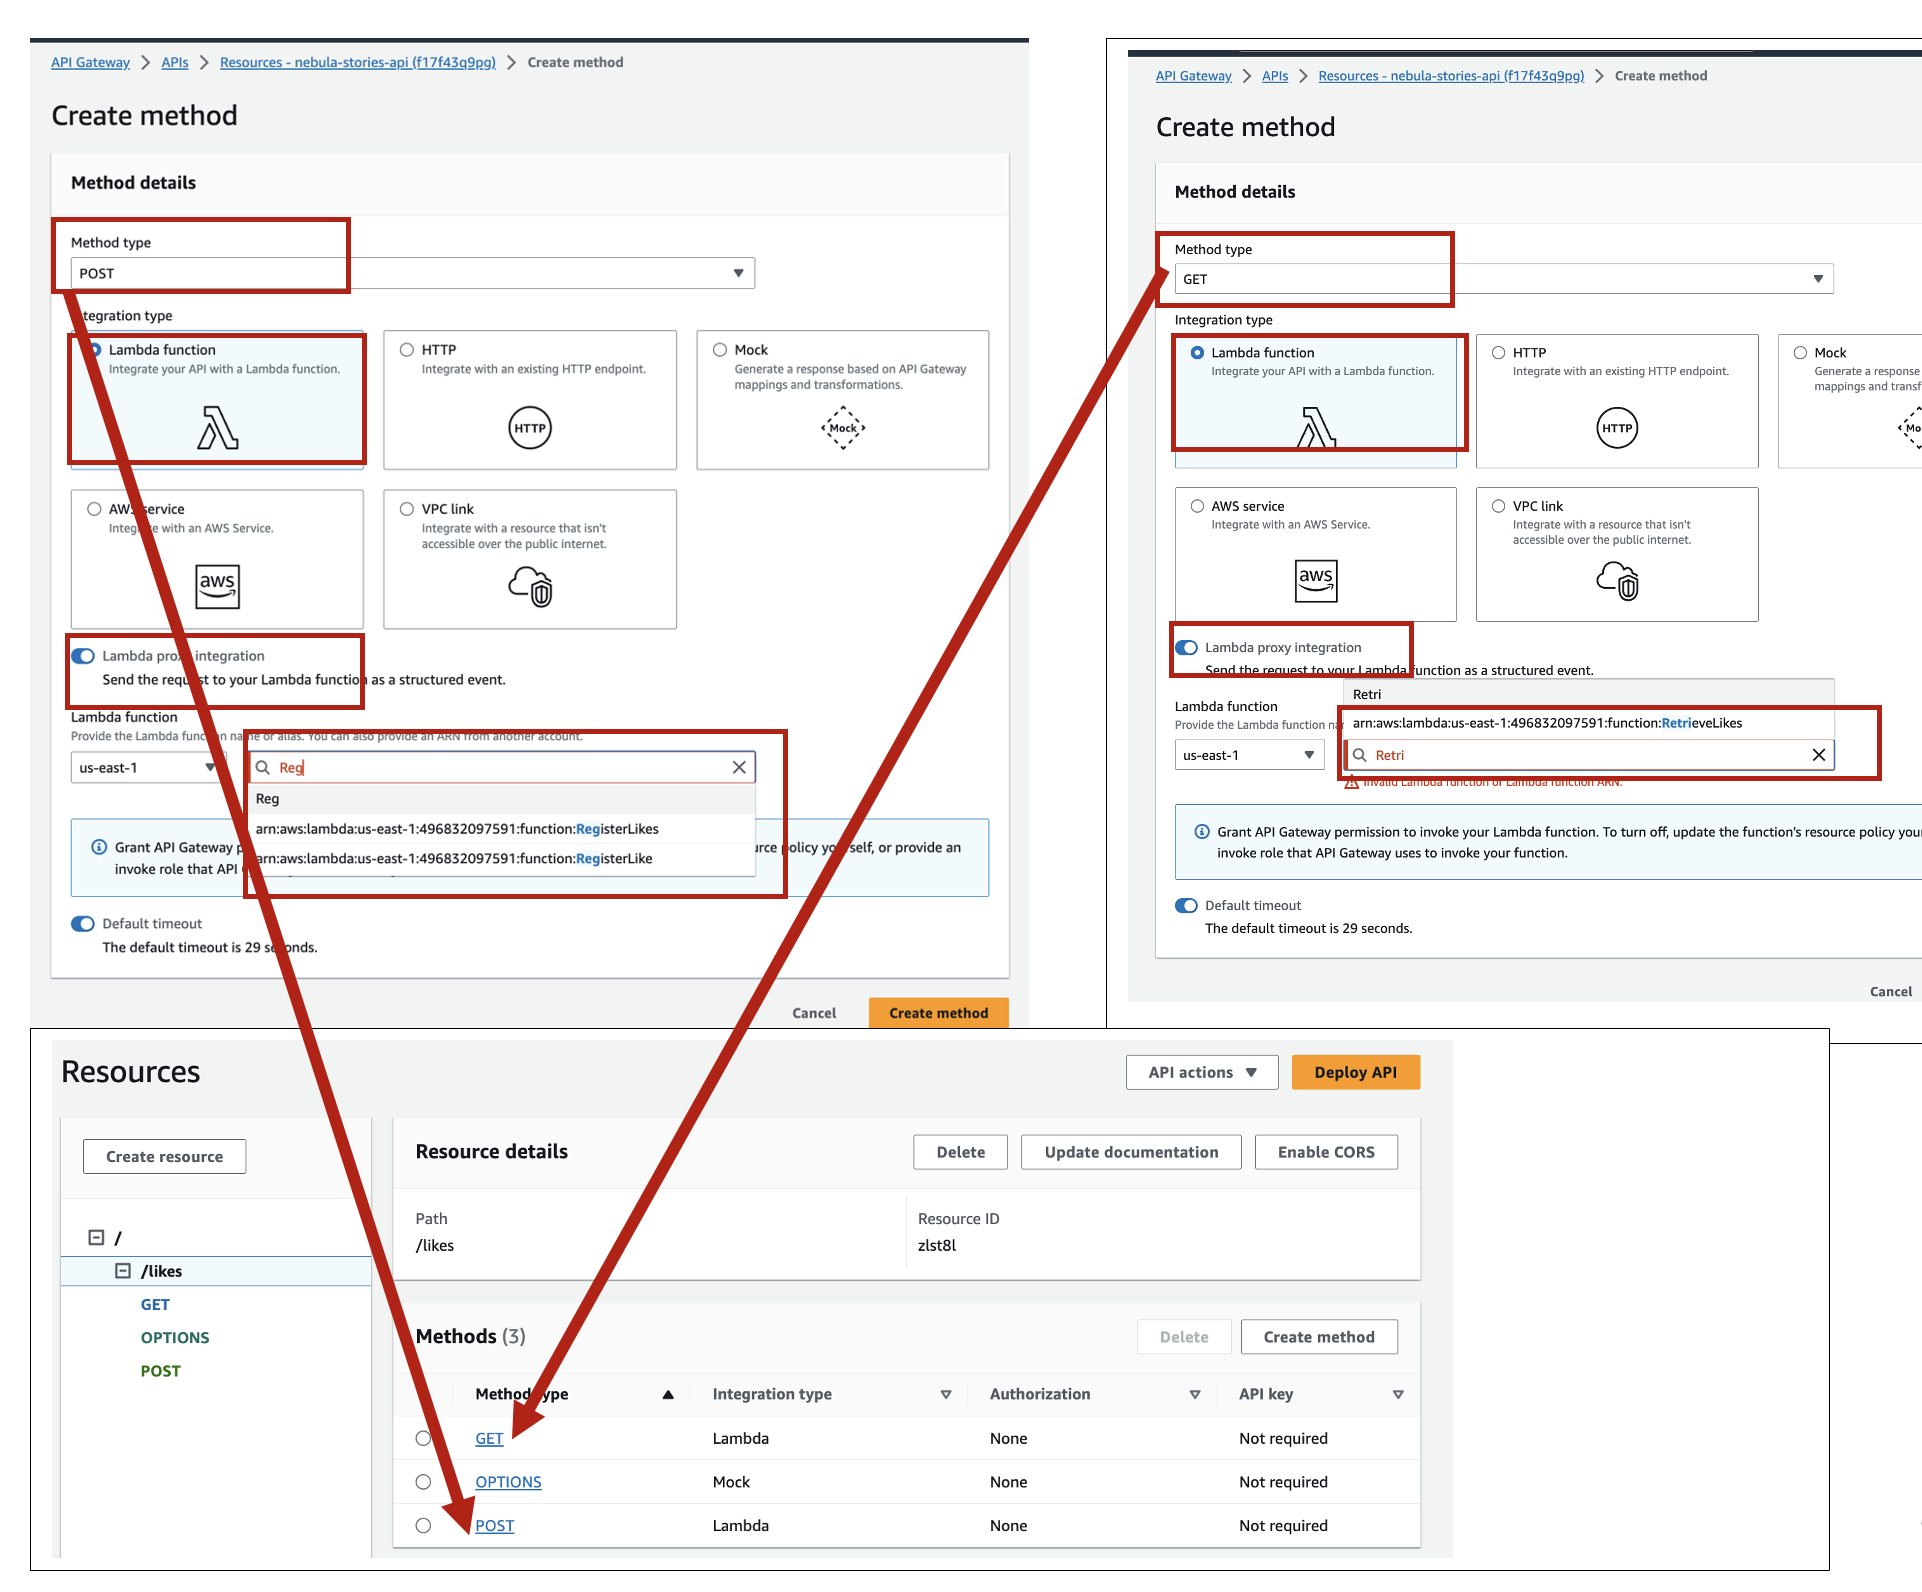
• Create a new API, then create a resource name it, and then go ahead with the methods creation (give them same name for sake of simplicity and convenience).
o Set up a POST method linked to the insertLike Lambda function: This method will both insert and increment like in the DynamoDB.
o Set up a GET method linked to the loadLike Lambda function: This method will retrieve the like count.
o Set up a GET method linked to the loadUserLikeStatus Lambda function: This method will retrieve the like status of the current user if they have liked it or not, so they cannot like a story twice.
o Set up a GET method linked to the usersWhoLiked Lambda function: This method will retrieve the list of users who liked the story.
o Set up a GET method linked to the loadComment Lambda function: This method will load comments and users who made them.
o Set up a GET method linked to the loadCommentCount Lambda function: This method will load comments count.
NOTE:
The screenshots below are with different names (e.g., for insertLike, the screenshot only shows like), it was because I had created those resources the first time, and creating them again with the same name was not allowed, but the steps are exactly the same
Part 3.2: User writes a comment on a story - text stored in S3 and meta-data stored in DynamoDB
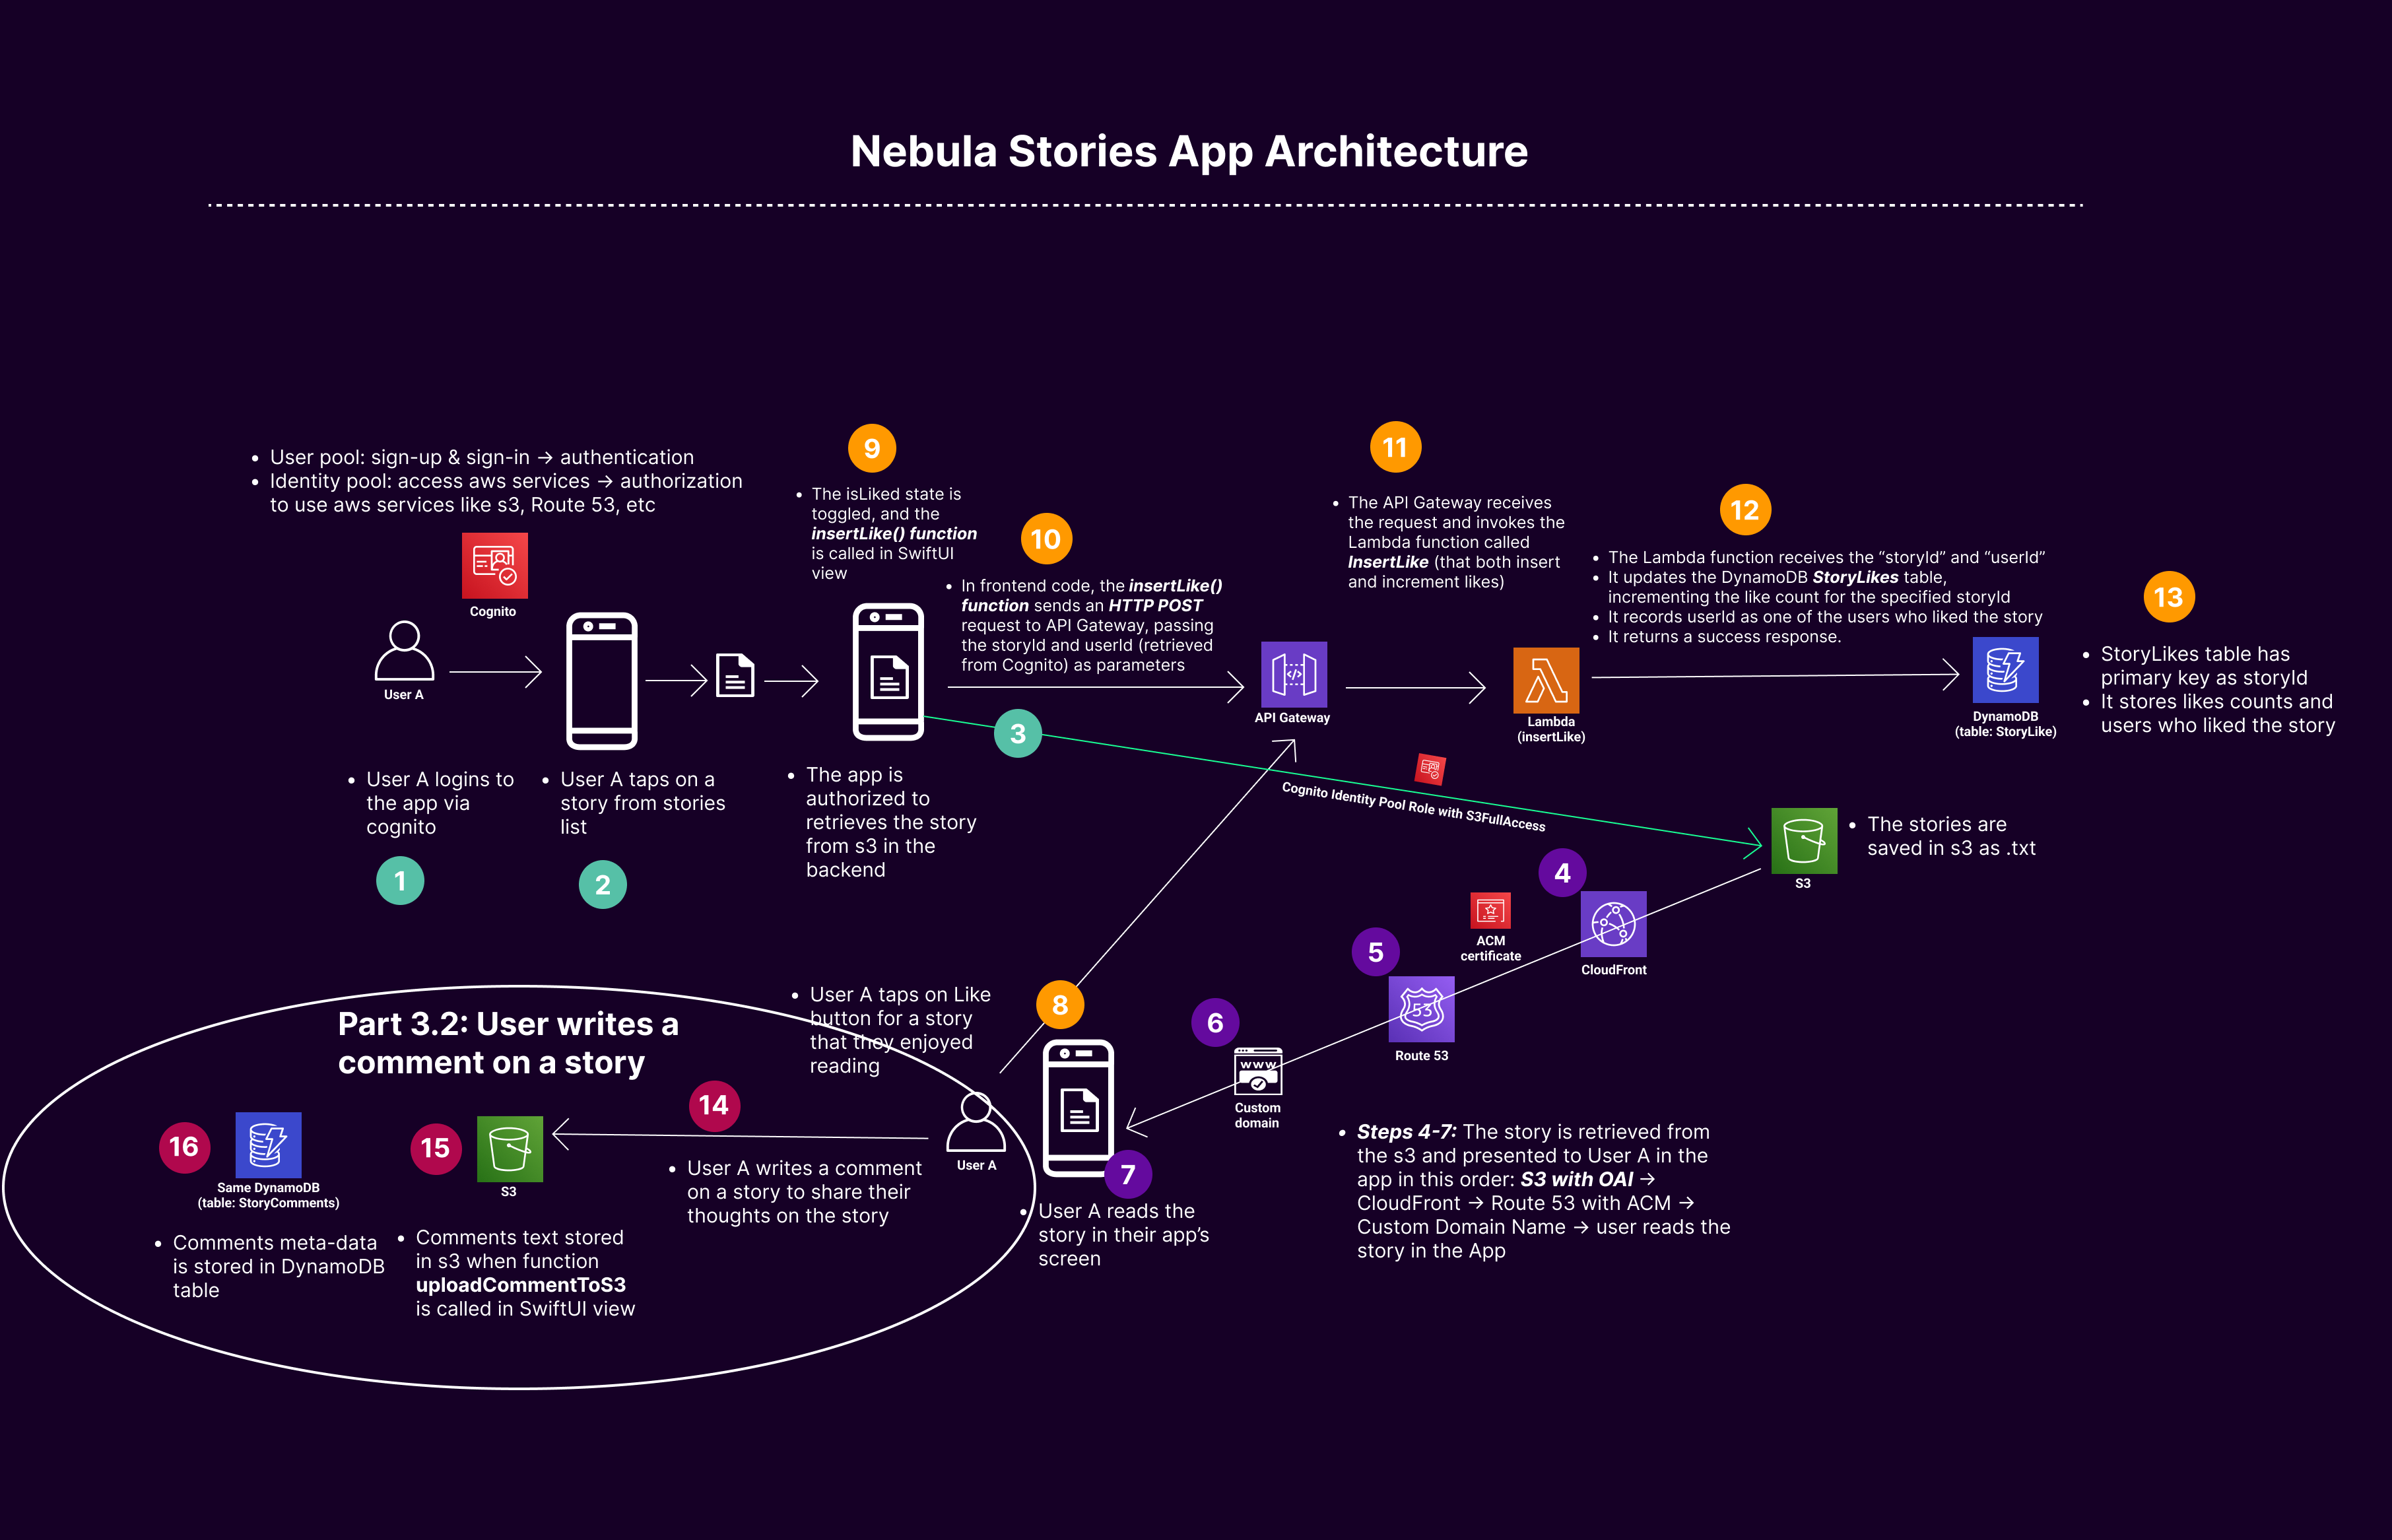
• User A writes a comment on a story to share their thoughts on the story
• Comments text stored in s3 when function uploadCommentToS3 is called in SwiftUI view
• Comments meta-data is stored in DynamoDB table
Part 3.3: App Load Stories Likes and Comments (GET method) - S3, DynamoDB, Lambda, & API-Gateway
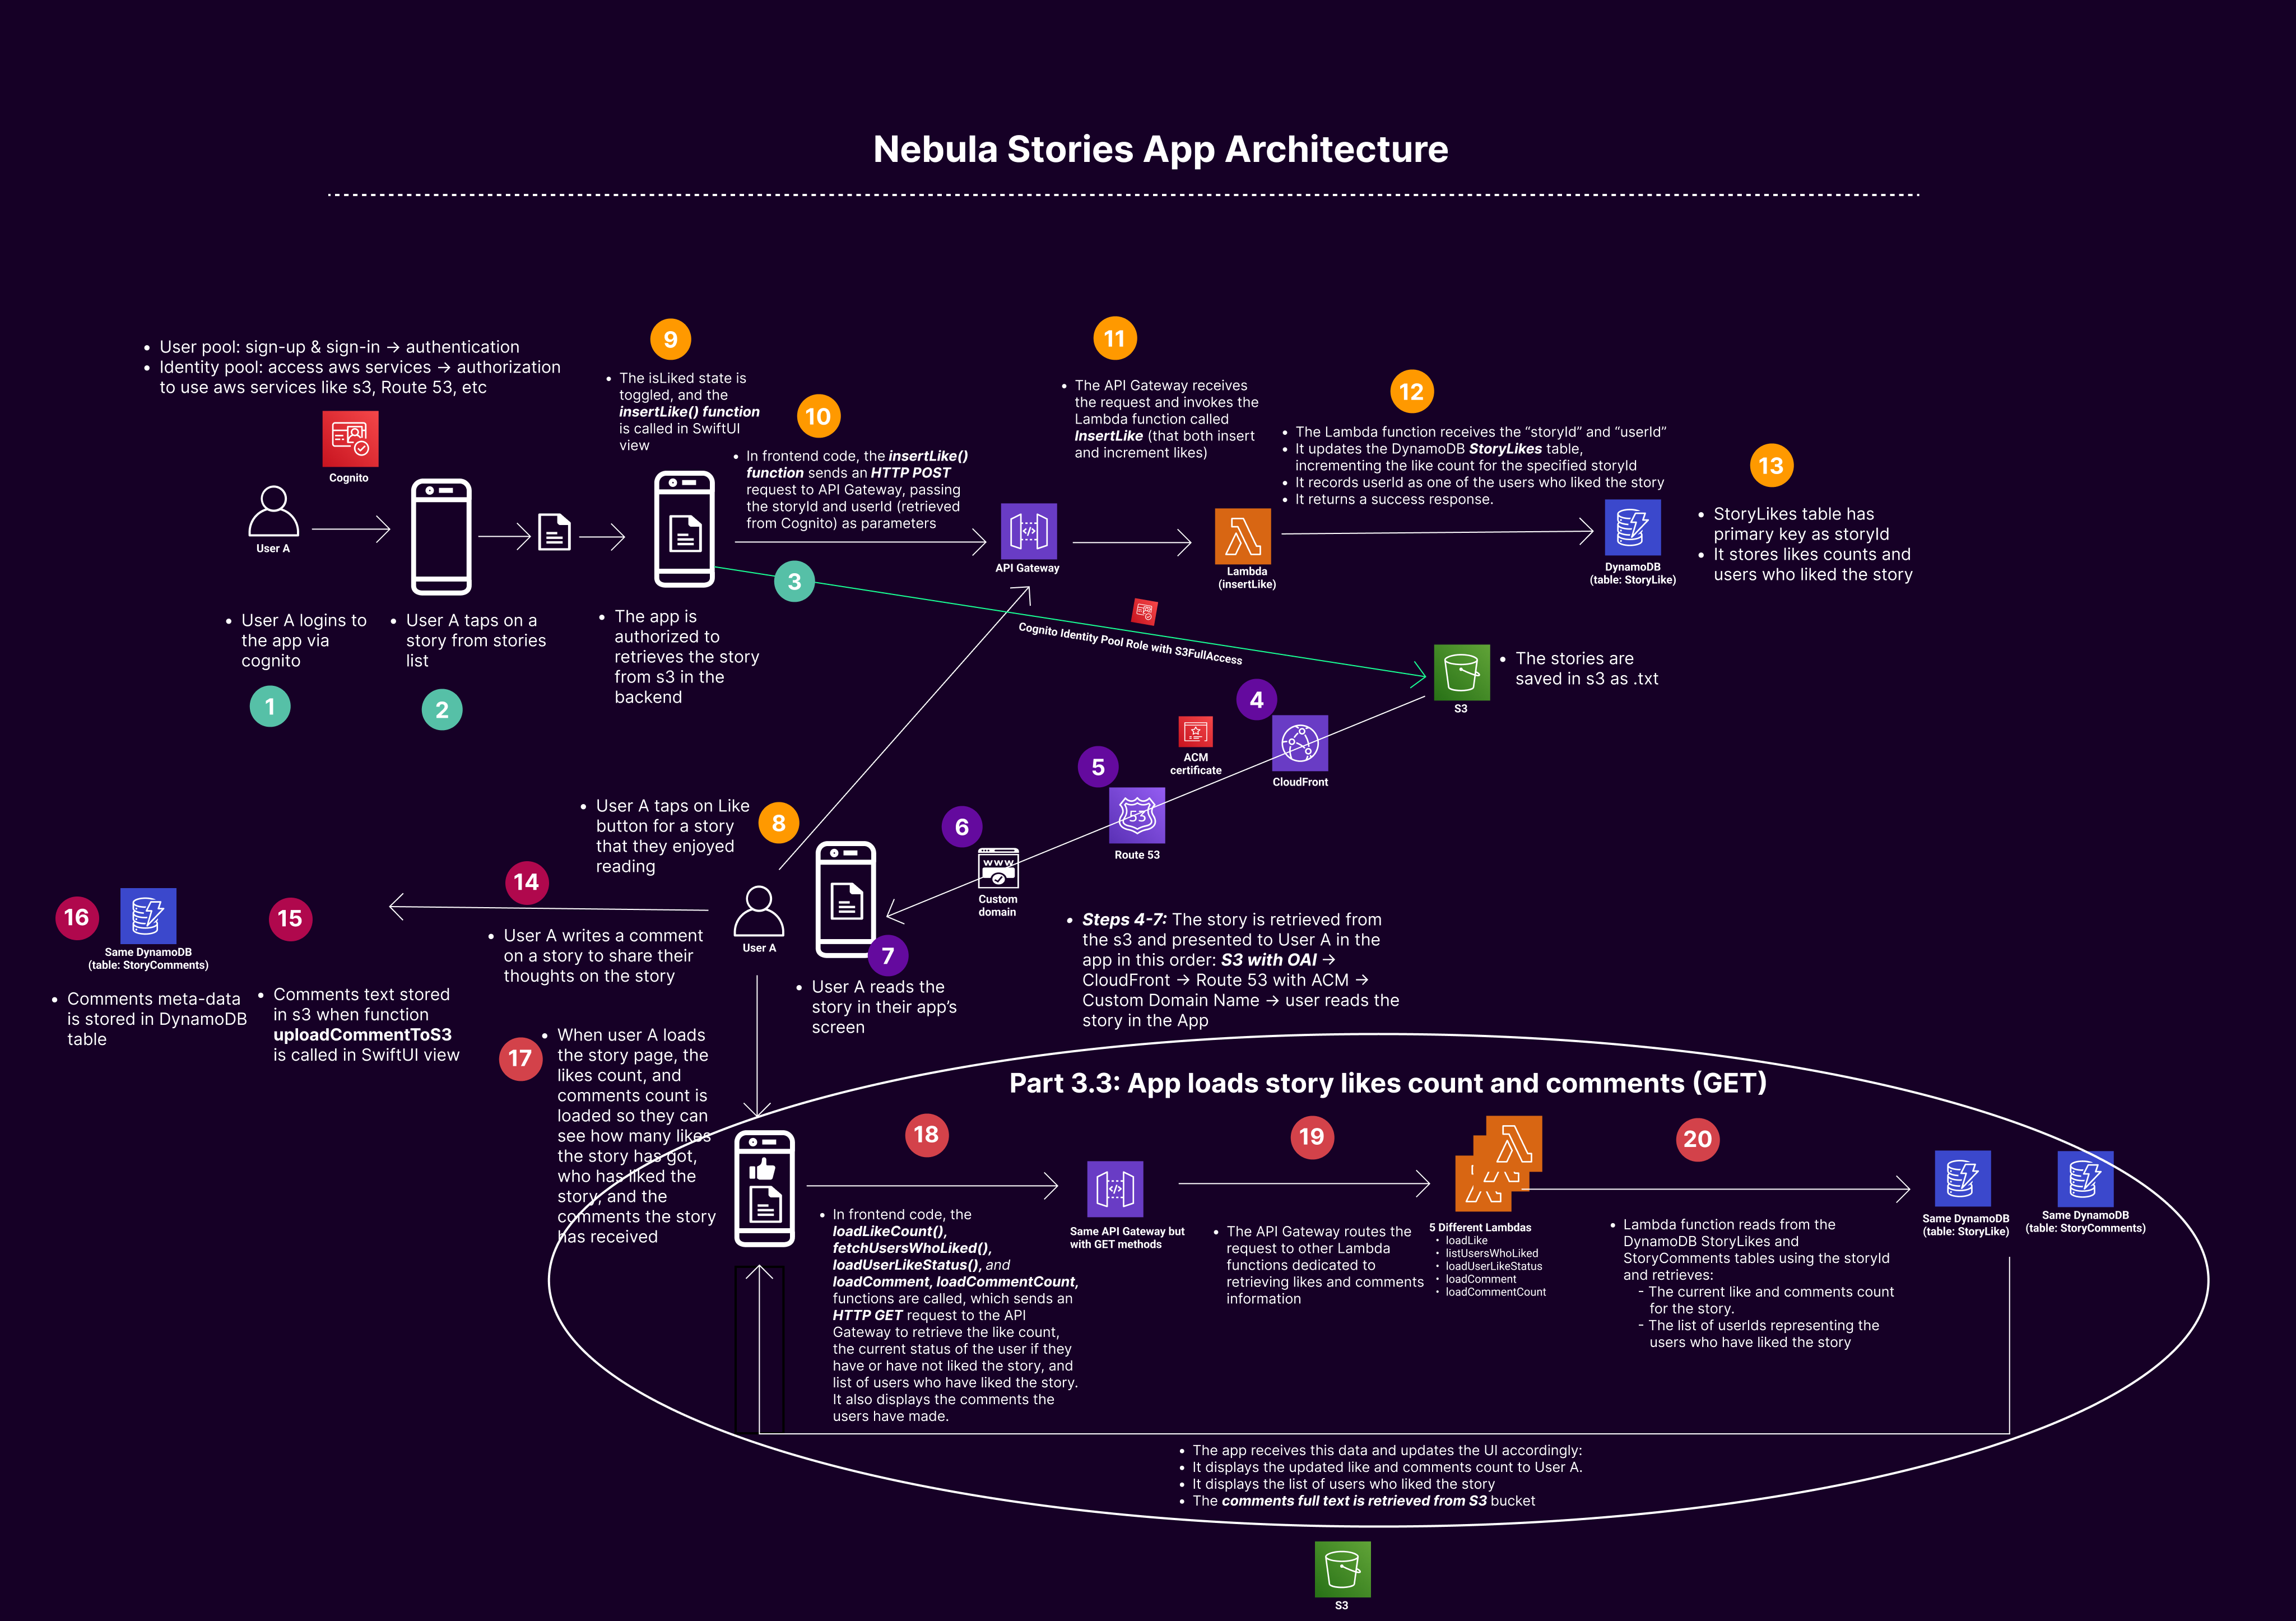
The steps for creating Lambda Function and API-gateway are the same as explained above (check Creating Lambada and API-Gateway steps in Part 3.1)
User Interaction with the App & backend processes
1. User A Likes a Story (check Part 3.1):
• User Action in the App: User A taps the "like" button on a story within your iOS app.
• App Updates State: The insertLike() function is called in your SwiftUI view.
• API Request: The insertLike() function sends an HTTP POST request to your API Gateway endpoint, passing the storyId and userId (retrieved from Cognito) as parameters.
• API Gateway: The API Gateway receives the request and invokes the corresponding AWS Lambda function.
• Lambda Function Execution: The Lambda function executes and performs the following:
o It receives the storyId and userId.
o It updates the DynamoDB StoryLikes table, incrementing the like count for the specified storyId.
o It records userId as one of the users who liked the story.
o It returns a success response.
2. User A Logs In and Views the Story (check Part 3.3):
• User A Logs In: User A opens the app and logs in using Amazon Cognito.
• App Retrieves Story: User A navigates to view a story.
• Load Likes and Comments Count and user names: The loadLike, loadUserLikeStatus, usersWhoLiked, loadComment, loadCommentCount functions are called, which send an HTTP GET request to the respective API Gateway endpoint to retrieve the like and comment count, the like status of the current user, the list of users who liked the story, and the comments content and users who have posted the comments
• API Gateway to Lambda: The API Gateway routes the request to the respective Lambda functions dedicated to retrieving this information.
• Lambda Function Retrieves Data: The Lambda function reads from the DynamoDB StoryLikes, and StoryComments table using the storyId and retrieves:
o The current likes count and comments for the story.
o The current user like status, to check if they have already liked the story.
o The list of usernames representing the users who have liked the story.
• App Displays Data: The app receives this data and updates the UI accordingly:
o It displays the updated like count to User A.
o It displays the list of users who liked the story, including User A. If user A haven’t like the story, they can like it now, if they have liked it already then they will not be allowed to like it again.
Part 3 Videos on how to implement the steps above are given below
------------------------------------The end of the first blog on Nebula Stories App ------------------------------------


